Link prediction aims to predict the likelihood of a future or missing connection between nodes in a network. It is widely used in various applications, such as social networks, recommendation systems, and biological networks. We'll focus on link prediction in social networks, and for that we'll use the same dataset that was used for local link prediction with DGL in the previous post - Twitch social network data. This dataset contains a graph with its nodes representing Twitch users and edges representing mutual friendship between users. We'll use that to predict new links ('follows') between users, based on existing links and user features.
As shown in the diagram, link prediction involves multiple steps including importing, exporting, and preprocessing the data, training a model and optimizing its hyperparameters, and finally setting up and querying an inference endpoint that generates actual predictions.
In this post we'll focus on the first step of the process: preparing the data and loading it into a Neptune cluster.
CONVERTING THE DATA TO NEPTUNE LOADER FORMAT
The initial files in the dataset look like this:
Vertices (initial):
id,days,mature,views,partner,new_id
73045350,1459,False,9528,False,2299
61573865,1629,True,3615,False,153
...
Edges (initial):
from,to
6194,255
6194,980
...
To load that data into Neptune, first we need to convert the data into one of the supported formats. We'll use a Gremlin graph, so the data must be in CSV files with vertices and edges, and the column names in the CSV files must follow this pattern.
Here's what the converted data looks like:
Vertices (converted):
~id,~label,days:Int(single),mature:Bool(single),partner:Bool(single),views:Int(single)
2299,"user",1459,false,false,9528
153,"user",1629,true,false,3615
...
Edges (converted):
~from,~to,~label,~id
6194,255,"follows",0
255,6194,"follows",1
...
And this is the code that converts the files provided with the dataset to the format that Neptune Loader supports:
import pandas as pd

# === Vertices ===

# load vertices from the CSV file provided in the dataset
vertices_df = pd.read_csv('./musae_ENGB_target.csv')

# drop old ID column, we'll use the new IDs only
vertices_df.drop('id', axis=1, inplace=True)

# rename columns for Neptune Bulk Loader:
#   add ~ to the id column,
#   add data types and cardinality to vertex property columns
vertices_df.rename(
    columns={
        'new_id': '~id',
        'days': 'days:Int(single)',
        'mature': 'mature:Bool(single)',
        'views': 'views:Int(single)',
        'partner': 'partner:Bool(single)',
    },
    inplace=True,
)

# add vertex label column
vertices_df['~label'] = 'user'

# save vertices to a file, ignore the index column
vertices_df.to_csv('vertices.csv', index=False)

# === Edges ===

# load edges from the CSV file provided in the dataset
edges_df = pd.read_csv('./musae_ENGB_edges.csv')

# add reverse edges (the original edges represent mutual follows)
reverse_edges_df = edges_df[['to', 'from']]
reverse_edges_df.rename(columns={'from': 'to', 'to': 'from'}, inplace=True)
reverse_edges_df.head()
edges_df = pd.concat([edges_df, reverse_edges_df], ignore_index=True)

# rename columns according to Neptune Bulk Loader format:
# add ~ to 'from' and 'to' column names
edges_df.rename(columns={
        'from': '~from',
        'to': '~to',
    },
    inplace=True,
)
edges_df.head()

# add edge label column
edges_df['~label'] = 'follows'

# add edge IDs
edges_df['~id'] = range(len(edges_df))

# save edges to a file, ignore the index column
edges_df.to_csv('edges.csv', index=False)
ALLOWING NEPTUNE DB ACCESS DATA IN S3: IAM ROLE AND VPC ENDPOINT
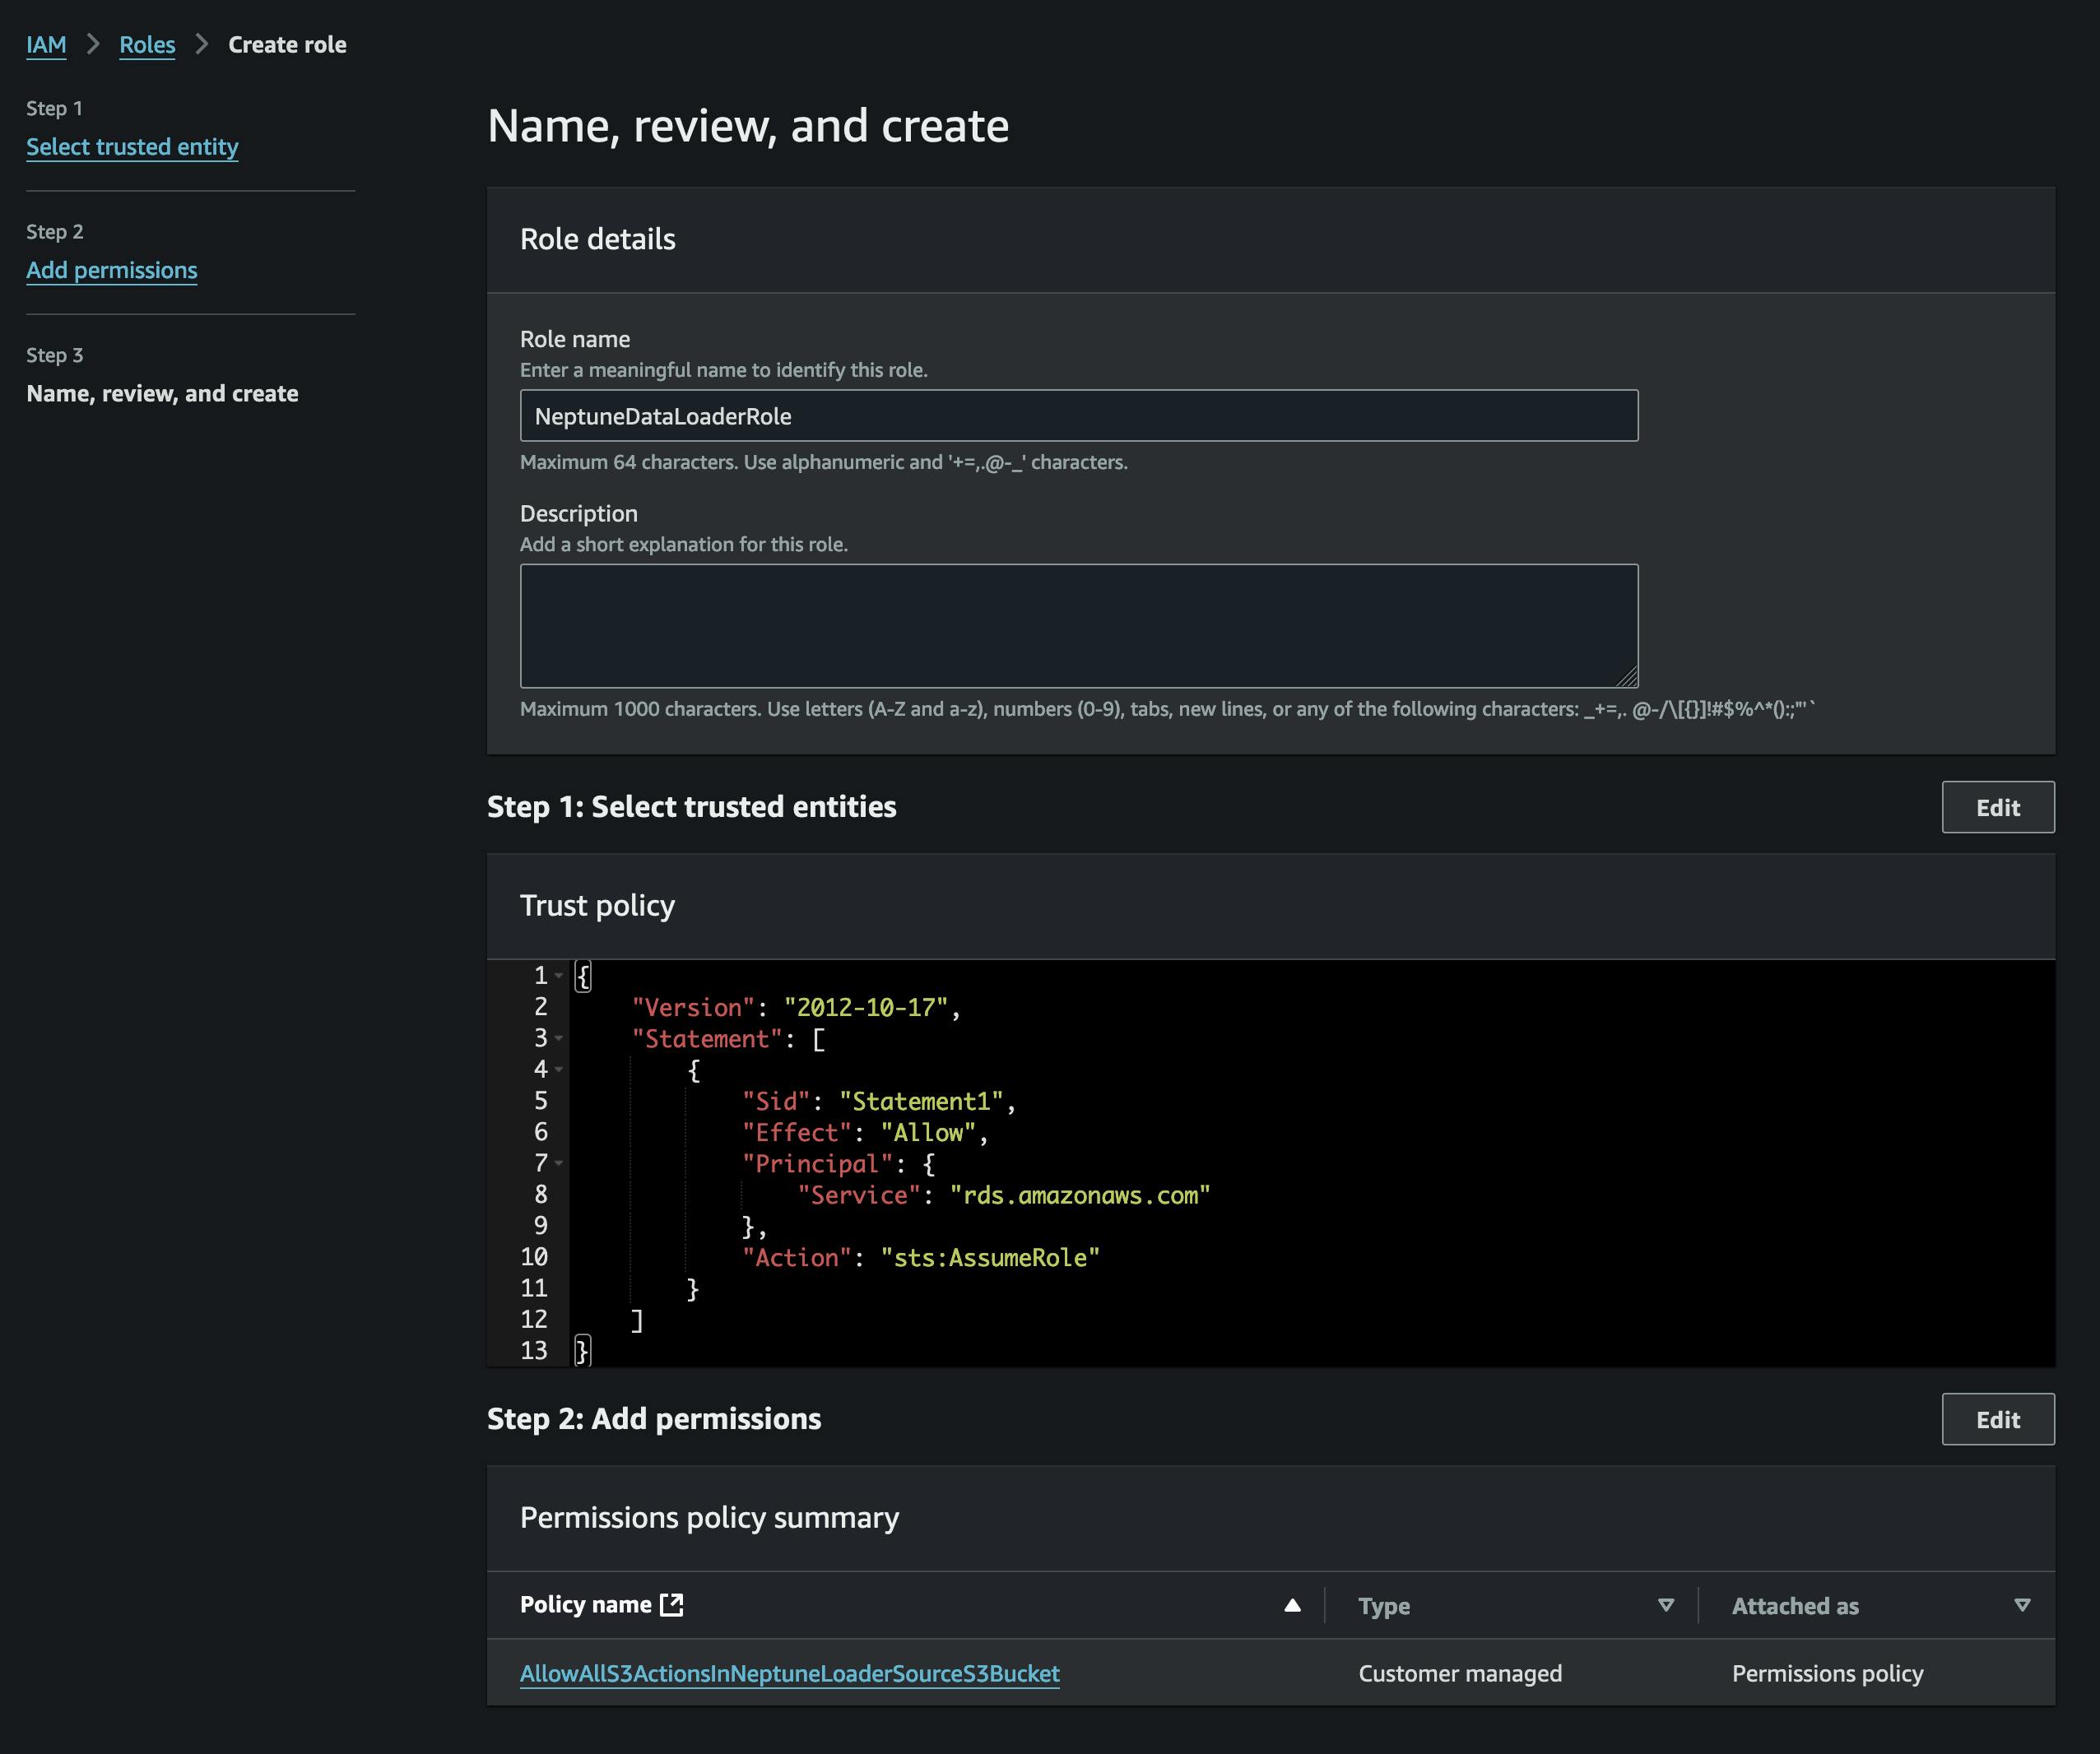
After converting the files we'll upload them to S3. In order to do that, first we need to create a bucket that will contain our vertices.csv and edges.csv files. We also need to create an IAM role that allows access to that S3 bucket (in the attached policy) and has a trust policy that allows Neptune to assume it (refer to the screenshot).

We'll add the role to our Neptune cluster (using the Neptune console), and then we'll wait for it to become active (or reboot the cluster).


We also need to allow network traffic from Neptune to S3, and to do that we need a Gateway VPC endpoint for S3 in our VPC:


LOADING DATA
We're now ready to start loading our data. To do that, we need to call the cluster's API from inside the VPC to and create 2 loading jobs: one for vertices.csv, and another one for edges.csv. The API calls are identical, only the S3 object key varies. The VPC configuration and the security groups must allow traffic from the instance where you run curl to the Neptune cluster.
curl -XPOST \
    -H 'Content-Type: application/json' \
    https://your-neptune-endpoint:8182/loader -d '
    {
      "source" : "s3://bucket-name/vertices.csv",
      "format" : "csv",
      "iamRoleArn" : "arn:aws:iam::account-id:role/role-name",
      "region" : "us-east-1",
      "failOnError" : "TRUE",
      "parallelism" : "HIGH",
      "updateSingleCardinalityProperties" : "FALSE"
    }'
The loader API responds with a JSON that contains the job id ('loadId'):
{
    "status" : "200 OK",
    "payload" : {
        "loadId" : "your-load-id"
    }
}
You can check if the loading is completed by using this API:
curl -XGET https://your-neptune-endpoint:8182/loader/your-load-id
It responds with this:
{
    "status" : "200 OK",
    "payload" : {
        "feedCount" : [
            {
                "LOAD_COMPLETED" : 1
            }
        ],
        "overallStatus" : {
            "fullUri" : "s3://bucket-name/vertices.csv",
            "runNumber" : 1,
            "retryNumber" : 1,
            "status" : "LOAD_COMPLETED",
            "totalTimeSpent" : 8,
            "startTime" : 1,
            "totalRecords" : 35630,
            "totalDuplicates" : 0,
            "parsingErrors" : 0,
            "datatypeMismatchErrors" : 0,
            "insertErrors" : 0
        }
    }
Once the vertices are loaded from vertices.csv, we can load edges using the same API. To do that, we just replace vertices.csv with edges.csv and run the first curl command again.
VERIFYING THE LOADED DATA
When the loading jobs are completed, we can access the loaded data by sending Gremlin queries to the Neptune cluster. To run these queries, we can either connect to Neptune with a Gremlin console or use a Neptune / Sagemaker Notebook. We'll use a Sagemaker notebook that can be either created together with the Neptune cluster or added later when the cluster is already running.
This is the query that gets the number of vertices we created:
%%gremlin

g.V().count()
You can also get a vertex by ID and verify that its properties were loaded correctly with:
%%gremlin

g.V('some-vertex-id').elementMap()


After loading edges, you can verify that they are loaded successfully with
%%gremlin

g.E().count()
and
%%gremlin

g.E('0').elementMap()


This concludes the data loading part of the process. In the next post we'll look at exporting data from Neptune in a format that can be used for ML model training.