
Besides a regular webapp and a Mac app, which uses the same endpoints as the webapp, Home Assistant also provides mobile apps. In this post, I want to describe its advantages over the former. I'll use iOS to do this: Samsung's French partner to recycle used mobiles tricked me once, and I moved away from Samsung. I decided to buy Apple for better integration since I've had Mac computers for the last few years.
Installing and Configuring
The companion app is readily available at the Apple Store. Note that the app is both free as a beer and free as a bird. It's provided under the Apache v2 License. If interested, the source code is on GitHub.
Once installed, you must configure at least one Home Assistant server. At this point, you should get the same UI as the web app. The app's power lies in its widgets, though.
Widgets
Some iOS applications allow you to add widgets to the UI. I'm not a massive user of widgets. I've Google Calendar, the Weather, and a VPN on my phone.
Widgets serve a dual purpose: visualization and possibly action; if a widget doesn't offer an action, pressing it will open the associated app. That's the case with the Google Calendar and Weather apps. My VPN widget displays a button allowing you to connect and pause.
The Companion App Widget
The app offers two distinct kinds of widgets, each serving a specific purpose. The first kind allows opening the app on a specific "page", e.g., Overview or Developer tools. IMHO, it's not very useful.
The second kind allows calling Home Assistant commands. However, it requires significantly more effort. First, we must create action objects. Here's one to switch the light on:
actions:
  - name: OfficeLightsOn                 #1
    label:
      text: "Turn ON Office Lights"      #2
    icon:
      icon: lightbulb-on-outline         #3
      color: "#ffff00"                   #3
    show_in_carplay: false
    show_in_watch: true
-
Name, but you should probably think about it as a String ID.
-
The label is shown in the companion app.
-
Graphic details used by the companion app
After creating the action, you must restart Home Assistant for devices to detect the new action. Once restarted, you can add a Home Assistant widget that is bound to that action.

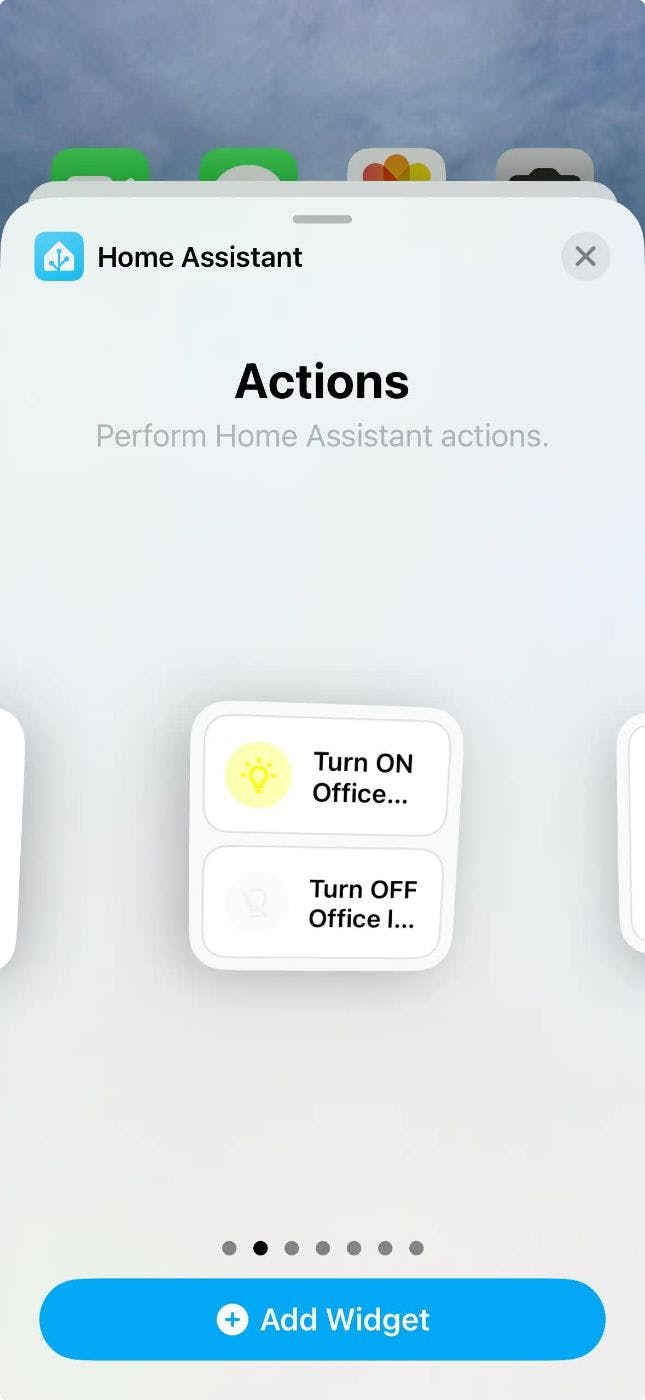
However, pressing the widget does nothing but a slight haptic feedback. We need to bind the action to an automation object. I explained automations when we migrated away from the Hue bridge in the previous post. At the time, we created an automation via the UI; we can also create one in the /homeassistant/configuration.yaml. We configure the action as the automation's trigger.
- alias: Turn On Office Lights On        #1
  trigger:
    - platform: event                    #2
      event_type: ios.action_fired       #2
      event_data:
        actionName: OfficeLightsOn       #3
  action:
    - service: light.turn_on             #4
      entity_id: light.all_office        #5
-
Friendly alias for easier maintenance.
-
Fixed payload sent to the device.
-
Configured payload sent to the device. If the payload matches, it will trigger the action.
-
Service to call.
-
Call the service on the device ID.
Now, pressing the widget turns on the light as expected.
Summary
Integrating Home Assistant on your device is straightforward. The pressing on the widget is the trigger for an automation - an action. You can create the automation or reuse an existing one.
To go further:
Originally published at A Java Geek on January 12th, 2025