


The state is a fundamental part of any application developed with React, and it is essential to efficiently and effectively manage the state to create modern, high-performance applications.
One of the popular libraries for state management in React is Zustand. In this tutorial, we will learn how to create and manage the state of an application using Zustand.
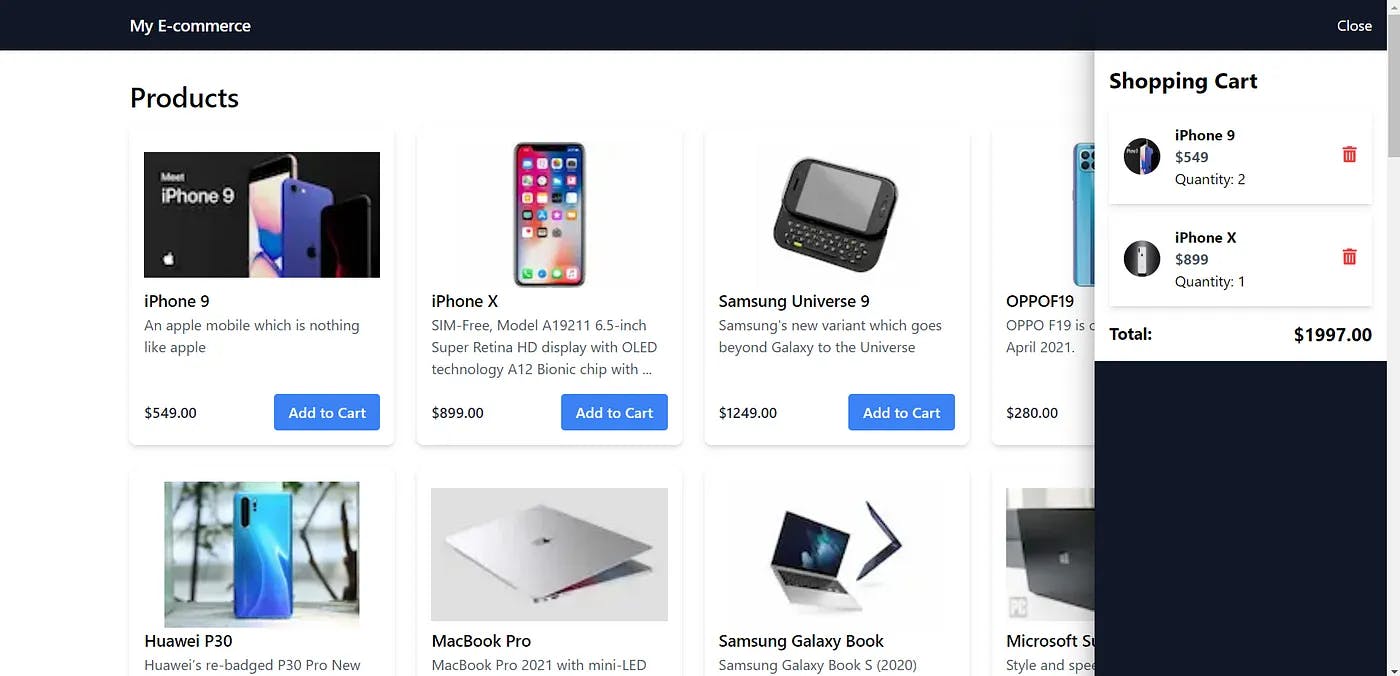
We will develop a simple shopping cart using Next.js and Tailwind CSS. It is not necessary to have specific knowledge about Next.js as well as Tailwind CSS. Therefore, you will be able to follow the tutorial with React and CSS knowledge only.
Also, we will use dummyJSON to make requests and retrieve fake JSON data, in particular, we will use https://dummyjson.com/products
With that in mind let’s get started!
What is Zustand?
Zustand is a Hooks-based state management library that provides a simple and powerful solution for managing the state of an application globally.
One of the main advantages of Zustand is that you can create state stores that are independent of components and can be shared and accessed from anywhere in your application, which means you don’t need to wrap your components in Providers.
Setting Up
-
We create a new Next.js project with the following command and follow the steps indicated.
pnpm create-next-app
2. We install the dependencies that we will need in the project:
pnpm install zustand
3. After that, we will create the following structure for the project:
...
├── src/
│   ├── components/
│   │   ├── minicart/
│   │   │   ├── Cart.tsx
│   │   │   └── CartItem.tsx
│   │   ├── products/
│   │   │   ├── ProductCart.tsx
│   │   │   └── ProductList.tsx
│   │   ├── ui/
│   │   │   ├── Drawer.tsx
│   │   │   └── Header.tsx
│   ├── data/
│   │   └── db-dummy.ts
│   ├── hooks/
│   │   └── useFromStore.ts
│   ├── pages/
│   │   ...
│   │   └── index.js
│   │   ...
│   ├── store/
│   │   ├── useCartStore.ts
│   │   └── useProductsStore.ts
...
Creating the Store for the Cart
- Defining the required types.
types.d:
export interface Product {
 id: number
 title: string
 description: string
 price: number
 discountPercentage: number
 rating: number
 stock: number
 brand: string
 category: string
 thumbnail: string
 images: string[]
 quantity?: number
}
2. Creating the store.
useCartStore:
import { create } from "zustand"

import { Product } from "../types"

// Define the interface of the Cart state
interface State {
 cart: Product[]
 totalItems: number
 totalPrice: number
}

// Define the interface of the actions that can be performed in the Cart
interface Actions {
 addToCart: (Item: Product) => void
 removeFromCart: (Item: Product) => void
}

// Initialize a default state
const INITIAL_STATE: State = {
 cart: [],
 totalItems: 0,
 totalPrice: 0,
}

// Create the store with Zustand, combining the status interface and actions
export const useCartStore = create<State & Actions>((set, get) => ({
 cart: INITIAL_STATE.cart,
 totalItems: INITIAL_STATE.totalItems,
 totalPrice: INITIAL_STATE.totalPrice,
 addToCart: (product: Product) => {
  const cart = get().cart
  const cartItem = cart.find(item => item.id === product.id)

  // If the item already exists in the Cart, increase its quantity
  if (cartItem) {
   const updatedCart = cart.map(item =>
    item.id === product.id ? { ...item, quantity: (item.quantity as number) + 1 } : item
   )
   set(state => ({
    cart: updatedCart,
    totalItems: state.totalItems + 1,
    totalPrice: state.totalPrice + product.price,
   }))
  } else {
   const updatedCart = [...cart, { ...product, quantity: 1 }]

   set(state => ({
    cart: updatedCart,
    totalItems: state.totalItems + 1,
    totalPrice: state.totalPrice + product.price,
   }))
  }
 },
 removeFromCart: (product: Product) => {
  set(state => ({
   cart: state.cart.filter(item => item.id !== product.id),
   totalItems: state.totalItems - 1,
   totalPrice: state.totalPrice - product.price,
  }))
 },
}))
In this code, we use createfunction to create a store to manage the state of the shopping cart. The store has three properties in its state:
cart, which is an array of products of type product added to the cart.
totalItems, which is the total number of products in the cart.
totalPrice, which is the total price of the products in the cart.
We also define two actionsin the store:
addToCart, which adds a product to the cart and updates the cart status.
removeFromCart, which removes a product from the cart and updates the status accordingly.
The store uses the set function provided by Zustand to update the shopping cart state immutably, maintaining the integrity of the state at all times. You can use this store in your components to access and update the shopping cart status easily and efficiently.
Creation of components
-
Initially, we will use data stored in a local file. Later, we will explore how to make use of fetch with Zustand to fetch data from an external API.
-
We will create the necessary components for our application and show only the important parts of the code. However, if you wish to review the complete code, you can access the project repository that will be provided at the end of the tutorial.
index.tsx:
...
import { products } from "@/data/db-dummy"

export default function Home() {
 const [isDrawerOpen, setIsDrawerOpen] = useState(false)

 const handleCartIconClick = () => {
  setIsDrawerOpen(!isDrawerOpen)
 }

 return (
  <>
   <Header onCartIconClick={handleCartIconClick} />
   <Drawer isOpen={isDrawerOpen} onCartIconClick={handleCartIconClick}>
    <Cart />
   </Drawer>
   <main className='container mx-auto md:w-10/12 py-8 px-4'>
    <ProductList products={products} />
   </main>
  </>
 )
}
Header.tsx:
...
import { useCartStore } from "../../store/useCartStore"

export default function Header({ onCartIconClick }: Props) {

// Get the cart status using the hook useCartStore, which gives us access to the cart status of the store.
 const totalItems = useFromStore(useCartStore, state => state.totalItems)

 return (
  <header className='bg-gray-900 text-white py-4 flex items-center justify-between h-14 sticky top-0 z-10'>
    ...
    <div className='text-white rounded-full bg-blue-700 w-5 h-5 text-sm -ml-1'>
     {totalItems}
    </div>
    ...
  </header>
 )
}
Cart.tsx :
...
import { useCartStore } from "../../store/useCartStore"

export default function Cart() {
 // Get the cart status using the hook useCartStore, which gives us access to the cart status of the store.
  const cart = useCartStore(state => state.cart);

  // Calculate the total price of the products in the cart by adding the prices of each product multiplied by its quantity.
  const total = cart.reduce((acc, product) => acc + product.price * (product.quantity as number), 0);

 return (
  <section>
   <ul>
    {cart.map(product => (
     <CartItem key={product.id} product={product} />
    ))}
   </ul>
   <div className='flex justify-between items-center mt-4'>
    <span className='text-lg font-bold'>Total:</span>
    <span className='text-xl font-bold'>${total.toFixed(2)}</span>
   </div>
  </section>
 )
}
CartItem.tsx :
...
import { useCartStore } from "../../store/useCartStore"
...

export default function CartItem({ product }: Props) {

// Recover the store action to remove items from the cart
 const removeFromCart = useCartStore(state => state.removeFromCart)

 return (
  <li className='flex justify-between items-center gap-4  mb-2 shadow-md p-4'>
    ...
   <div>
    <button
     title='Remove Item'
     className='text-red-500 hover:text-red-600 ml-4'
     onClick={() => removeFromCart(product)}
    >
     <FaTrashAlt size={18} />
    </button>
   </div>
  </li>
 )
}
ProductCard.tsx:
...
import { useCartStore } from "../../store/useCartStore"
...

export default function ProductCard({ product }: Props) {
// Recover the store action to add items to cart
 const addToCart = useCartStore(state => state.addToCart)

 return (
  <div className='bg-white rounded-lg shadow-md overflow-hidden hover:shadow-xl flex flex-col justify-between p-4 '>
   ...
   <div className='flex-1 flex flex-col justify-between'>
    ...
    <div className='mt-4 flex items-center justify-between'>
     <span className='text-gray-800 font-semibold'>${product.price}</span>
     <button
      type='button'
      className='ml-2 bg-blue-500 text-white font-semibold py-2 px-4 rounded hover:bg-blue-600'
      onClick={() => addToCart(product)}
     >
      Add to Cart
     </button>
    </div>
   </div>
  </div>
 )
}
As we can see, to use the state of Zustand, we simply import the hook of the corresponding store and extract the states or actions that we want to use in our component.
With these steps, we have created a basic shopping cart that works. However, if you wish, you can supplement it with more features according to your specific needs and requirements.

Now, to further extend the functionality offered by Zustand, we are going to implement data fetching and use middleware to persist the state. This will allow us to ensure that items already in the cart are not lost, even if the page is reloaded or closed.
Fetching with Zustand
-
To get the
productsfrom the API, we will create a new store, which will allow us to manage the retrieved data.
useProductsStore:
import { create } from "zustand"

import { Product } from "../types.d"

interface State {
 products: Product[]
 isLoading: boolean
 error: any
}

interface Actions {
 fetchData: () => Promise<void>
}

const INITIAL_STATE: State = {
 products: [],
 isLoading: false,
 error: null,
}

export const useProductsStore = create<State & Actions>(set => ({
 products: INITIAL_STATE.products,
 isLoading: INITIAL_STATE.isLoading,
 error: INITIAL_STATE.error,
 fetchData: async () => {
  try {
   set({ isLoading: true, error: null })
   const response = await fetch("https://dummyjson.com/products")
   const data = await response.json()
   set({ products: data.products, isLoading: false })
  } catch (error) {
   set({ error, isLoading: false })
  }
 },
}))
We will define two important interfaces: Stateand Actions. The State interface will represent the state structure of the store, which includes a list of products, the loading status, and any errors that may occur during data loading.
The Actions interface, on the other hand, will represent the actions that can be performed in the store. In this case, we will only have one action called fetchData, which will be used to load the product data from the API.
2. Now, we need to update the index file to get the products from the store.
index.tsx:
...
import { useProductsStore } from "@/store/useProductsStore"

export default function Home() {
...

 const { products, isLoading, error, fetchData } = useProductsStore()

 useEffect(() => { fetchData() }, [fetchData])

...
 return (
  <>
   ...
   <main className='container mx-auto md:w-10/12 py-8 px-4'>
    {isLoading
      ? <div className='text-center text-lg'>Loading...</div>
      : <ProductList products={products} />
    }
   </main>
  </>
 )
}
Persisting state
In Zustand, persist middleware can be used to persist the state in the browser’s local storage, allowing the state to be maintained even after the page is reloaded or the browser is closed.
import { create } from "zustand"
// Imoprt persist middleware
import { persist } from "zustand/middleware"

...
// Persistence middleware configuration
export const useCartStore = create(
 persist<State & Actions>(
  (set, get) => ({
   cart: INITIAL_STATE.cart,
   totalItems: INITIAL_STATE.totalItems,
   totalPrice: INITIAL_STATE.totalPrice,
   addToCart: (product: Product) => { ... },
   removeFromCart: (product: Product) => { ... },
  }),
  {
   name: "cart-storage", // unic name
   // getStorage: () => sessionStorage, (optional) by default the 'localStorage' is used
  }
 )
)
To enable persistence of state in the browser’s local storage, we use persist to wrap the store. We specify the storage name as cart-storage, although by default persist uses the localStorage, so there is no need to explicitly declare it.
Done! Now we won’t lose the status of our shopping cart thanks to the persistence of the status. However, there is still one more thing we need to do to make sure it works properly.
If we update the browser, we may encounter an error similar to this one:


In short, this indicates that the state sent by the server does not match the state rendered on the client.
Error: react-hydration-error | Next.js (nextjs.org)
To quickly fix this error, we can follow these steps:
-
For all components that use a persisted state in the
localStorage, it is necessary to create a local state withuseState.
-
Use
useEffectto set the local state with the store data. This way, the local state will be updated when mounting the component, avoiding inconsistencies.
-
Use the local state of the created cart to render the items instead of directly using the state of the cart in the store.
Cart.tsx:
...
function Cart() {
 const [cartState, setCartState] = useState<Product[]>([])

 const cart = useCartStore(state => state.cart)
 const total = cartState.reduce((acc, product) => acc + product.price * (product.quantity as number), 0)

 useEffect(() => {
  setCartState(cart)
 }, [cart])

 return (
  <section>
   ...
   <ul>
    {cartState.map(product => (
     <CartItem key={product.id} product={product} />
    ))}
   </ul>
   ...
  </section>
 )
}

export default Cart
With this, we have solved the problem. However, we can further improve this approach to simplify the process.
4. We can create a custom hook called useFromStore. This hook will allow us to get the persisted state of the cart from the store in a simple and reusable way in several components.
useFromStore.ts:
import { useEffect, useState } from "react"

export default function useFromStore<T, F>(
 store: (callback: (state: T) => unknown) => unknown,
 storeCallback: (state: T) => F
) {
    const [state, setState] = useState<F>()

    const stateOfStore = store(storeCallback) as F

    useEffect(() => {
     setState(stateOfStore)
    }, [stateOfStore])

   return state
}
The hook receives two arguments:
-
store: A function that takes acallbackas an argument and calls it with the state of the store. The callback must return a value that will be the state to be retrieved from the store. This function acts as an interface to access the state of the store in the component.
-
storeCallback: A function that takes the state of the store as an argument and returns the specific value to be retrieved from the state. This callback is responsible for extracting the desired value from the state of the store.
With this custom hook, our components become cleaner and more reusable, as we can pass any persisted Zustand state as a parameter. This allows us to encapsulate the state fetching logic in a single place and use it in multiple components efficiently.
Cart.tsx :
...
import { useCartStore } from "../../stores/useCartStore"

import useFromStore from "../../hooks/useFromStore"

export default function Cart() {
 const cart = useFromStore(useCartStore, state => state.cart)

 let total = 0
 if (cart) {
  total = cart.reduce((acc, product) => acc + product.price * (product.quantity as number), 0)
 }

 return (
  <section>
   <h3 className='text-2xl font-bold mb-4'>Shopping Cart</h3>
   <ul>
    {cart?.map(product => (
     <CartItem key={product.id} product={product} />
    ))}
   </ul>
   <div className='flex justify-between items-center mt-4'>
    <span className='text-lg font-bold'>Total:</span>
    <span className='text-xl font-bold'>${total.toFixed(2)}</span>
   </div>
  </section>
 )
}
Versioning the state of Zustand
Finally, it is important to note that if we update the store structure, such as adding new values, removing old values, or changing its type, we may face state inconsistency errors, especially if we already have persistent data in the localStorage.
Fortunately, Zustand offers the option of using state versions to handle this kind of situation.
Suppose we want to change the name of totalItems to totalProducts:
...
export const useCartStore = create(
 persist<State & Actions>(
  (set, get) => ({ ... }),
  {
   name: "cart-storage",
   // getStorage: () => sessionStorage, (optional) by default the 'localStorage' is used
   version: 1, // State version number,
   migrate: (persistedState: unknown, version: number) => {
    if (version === 0) {
     // if the stored value is in version 0, we rename the field to the new name
     persistedState.totalProducts = persistedState.totalItems
     delete persistedState.totalItems
    }

    return persistedState as State & Actions
   },
  }
 )
)
Providing a state version number, any changes to the state structure will be handled properly in the storage persistence, avoiding inconsistency errors.
It is important to make sure to update the state version number whenever changes are made to the state structure to ensure the integrity of the data stored in localStorage.
And that’s it! We have now created a functional shopping cart, managing its state with Zustand. It’s worth mentioning that Zustand offers even more interesting features that you could explore.
Conclusion
In conclusion, Zustand is a powerful and simple state management library for React applications. It allows you to create component-independent state stores, making it easy to access and update states efficiently throughout the application.
I invite you to take a look at the documentation to discover more about the additional capabilities you can take advantage of with this powerful library.
Read more:
- Setting up a GraphQL Server and Client in Next.js
- How to Create a Modern Skeleton Loader in React to Improve User Experience
Want to connect with the Author?
Love connecting with friends all around the world on Twitter.
Also published here.